Saturday, January 30, 2016

My Eyebrow Routine: Eyebrow Tutorial

      I do believe that eyebrows can definitely affect how you look. It might be just a simple line of hairs on your face, but how you shape them and fill them in can drastically change your overall facial look.

       Believe it or not, I started seriously shaping and filling in my eye brows when I was on my senior year in college. I don't even like to do something with my brows at that time, but I have to since the makeup artist who did my makeup for my graduation photo shaped them. Ever since my eye brow hairs, started growing at that time, of course I have to do something about them to keep them neat. That's when I started plucking my eye brows to shape them.

        I do not claim that I own "perfect brows" but I got to say that I'm proud how neat my eye brows looked like. I don't believe "perfect brows" exist by the way. I think we have to adjust the color and their shape according to shape of our face. For instance, I do have a round face, so I have to arch them a bit at the end.
        I used to use eye brow pencil and a spoolie brush. But recently, I bought Maybelline's FashionBrow and I just decided to give it a try. So far, I'm loving it even though I still find using eye brow pencils faster. Well, I just have to get use to my new routine right? ehehe

        For my everyday eye brow routine, I use Maybelline's FashionBrow, the applicator that comes along with it and a spoolie brush. I don't use concealer to clean up or highlight the ends of my eye brows. This is how I do my eye brows and if you'd like to know how I do my brows, here's a tutorial  that I've prepared for you:
Note:
I have labelled the shades in Maybelline's eye brow pallette with letters a,b and c. I placed them in the part of my brows where I apply those shades.

1. Start by brushing your brows with a spoolie brush.

2. Start by building the arch of your brows and draw your first line from the arch to the tail end. You may use any shade that suits your brows, but in my case, I use the darkest shade (letter a ) in my eye brow pallete just because I noticed that it's the part that fades first.

3. Draw another line from the beginning of  your brows and connect it to the lines starting from your arch.

4. Start filling in the middle part of your brows with a lighter shade (letter b) than the one that you used in your arch.

5. Fill in the beginning of your brows with yet another lighter shade (letter a).

6. Grab your spoolie brush and brush your eye brows again to eliminate some harsh lines and to blend the colors that you use in your brows. That's also to make your eye brows look more natural.

Viola! now you have a neat looking brows! Here's a before and after photo of my brows:
P.S
The lighting in the photos looked different as I took them in different rooms hehehe.

I hope you enjoy this tutorial. Feel free to share them to someone you knew who needs extra help in the eye brows department too. lolx

love lots,
Tin

Sunday, January 24, 2016

Tea Kingdom At Pueblo Verde

    I have mentioned on one of my posts before that I am a big fan of milk tea. I'm not quite sure though if you have read about it especially if you are new in my blog. Next to coffee, milk tea or any regular tea is another favorite drink of mine. I am a fan of the drink, however, I am choosy with its taste. I don't just buy it from any place. If I do not like the taste coming from one establishment/ tea house, I will never buy any from that place again. My forever favorite milk tea house is QQ Suki House, which is located across the University of San Carlos (Main). But of course, I am also on thee go to try new things so when I discovered this Tea Kingdom in The Outlets at Pueblo Verde, I decided to pay the place a visit.

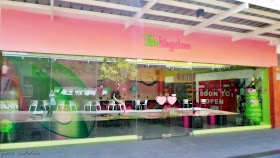
     The physical appearance of Tea Kingdom is definitely eye catching even before you enter the place. Just look at their door! even the door knob looks amazing!

      Tea Kingdom is just one of the newly opened establishments that opened in the new expansion at The Outlets. Here's a photo of the place if you aren't familiar with it. Tea Kingdom is located in the Fork Road of The Outlets.
      The Fork in the Road, I must say is the most instagrammable place in The Outlets. I have visited the place before, but I haven't took any Instagram worthy photo of the place. Check out the dope wall art below. It is also located in the new expansion of the place.

          Now here are some of the photos that I took inside the tea house!
       Tea Kingdom is a very cute place fit for a royalty. Just look at their decors! I am definitely in love with the interior design of the place. Even though I am not a fan of pink, I love the combination of pink and green in their place. I think it's a very lovely combination and very easy on the eyes. Thumbs up to the painted cherry blossoms in their wall too! Isn't it lovely?
       I am not so sure if they opened last Christmas but they do have that Christmas tree that is made out of tires! How creative! It looks pretty as well. By the way, all of their tables and chairs were all heart-shaped! They are so cute. Would love to take one for myself! ahahha
      Just like any other milk tea house, Tea Kingdom also sells pastry products like cupcakes and cookies. They also have their so called Specials which are actually fruits! I haven't tried any of them though as I am very much in the mood for milk tea that day! hehehe
      Those  cute little mirrors hanging on their wall were also made out of tires! Bravo Tea Kingdom!
       Can I just say that Tea Kingdom has the cutest lamp I've ever seen in my entire life? I want that teacup lamp so bad!!! huhuhu
      Another cute lamp with a cute little bunny beside it! A perfect thing for pink lovers!!!
     Now talking about their milk tea, it i fairly good! It is too milky for my taste but it's fine. I just think they milk overpowered the taste of the tea, but it taste good. I love the fact that Tea Kingdom lets their customers choose the sugar level of their drinks depending on their taste. How cool is that?

    I chose Jasmine Milk Tea with 75% sugar level. The medium size costs me 85php. Not a bad price! Their large sizes costs a little over 100 php. I paired my milk tea with this very cute Red Velvet Cupcake which costs 55php. The cupcake didn't taste any special, but it also taste good as well.
Overall thoughts:

     I love Tea Kingdom! The place looks quirky and cute and very clean at the same time! It is a perfect place for people who loves to take photos especially for girls who love pink and princess stuffs.

     If you are very particular about the taste of their tea, you don't have to worry too much because their drinks, like I said above are good. You can also grab yourself a piece of a cupcake or a cookie if you are feeling hungry.

     I would recommend the place to anyone especially for a group of friends who are looking for a new place to relax and chill.

    If you wish to visit the place, go to The Outlets at Pueblo Verde in Lapu-lapu City, Cebu. Tea Kingdom doesn't have any social media account (not that I know of), but you may check out Pueblo Verde's Facebook and Instagram page for inquiries.

     Thank you for reading and now I'm off to my sleeping kingdom! Good luck!

love lots,
Tin

Wednesday, January 13, 2016

A Wet n Wild Mega Last Lipstick Review

     If you have read some of my past blog posts, I wasn't kidding when I said I am a lipstick girl. By that what I mean is I absolutely love trying on different lipsticks in different shades. One of the best lipstick product that impressed me a lot are the ones from Wet n Wild cosmetics. Ever since I bought one of their mega last lipstick, I just went gaga over it! Let me tell you why on this review!~

     Recently, in addition to the only Wet n Wild Mega Last Lip Cover that I have, I bought two more lippies in the same line but in different shades. 

     First I bought the shade called "Vamp It Up" which is a dark violet shade. It actually looks like black in some photos, but well it's violet. Like dark violet. lelx. You'll know what I mean once you'll see more photos below!
     I always love to try lipsticks that are bolder and darker in color that's why I decided to purchase this shade. Well, actually the real reason is for me to wear this one during the Halloween season. But for some reasons, I wasn't able to wear at that time.

    The color is pretty dope as the lipstick itself is very pigmented, but as you can see, to pull off such shade requires a lip liner. I found it a little bit difficult to put on this shade because it might go all over outside the area of my lips knowing that I don't have any lip liner that matches with it. If you wanna try this shade, you just have to carefully apply the lipstick on your lips.

     By the way, aside from a costume or Halloween party, I do not know when to wear this shade yet. I just thought it would look too overwhelming if Ill wear this one on a normal basis. lol. Don't you think? Any sort of suggestions would be very welcome in the comment section below. 

    Ooopps, a thought just spark within my brain. This shade could be a really good deal if you just wanna channel the inner goth in you! ehehhehe Right now I am thinking of creating a look that will make us of this shade, stay tuned! :)
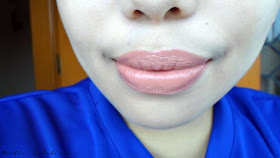
    This second shade that I have is called "Cinnamon Spice". This is the first shade that I owned and this is definitely my favorite among the three that I have with me. I have two reasons why. First is because it's color is very versatile and second is because a lot of people told me that the color really suits my skin color. Do you think so too guys? Feel ko naman ang moment! lol

     Cinnamon Spice, as you can see, is a dark red shade. It might look too bold for an everyday look, especially if you are working in school like me, but you can always use the lipstick by just dabbing it all over your lips.
     The last shade that I have is called "Bare It All". This shade has a perfect name since this is a nude lip color. I'm not feeling very confident about wearing nude lip colors but I love trying them on me.

     Bare It All actually reminds me of the Kardashian lip colors except that theirs' are glossy and Wet n Wild's Bare It All is matte. I wear this shade if I go somewhere off key, I mean somewhere that I don't really need so much color in my face. I sometimes use this in my work too although it's nothing usual since I still go for MAC's lipstick because of its longevity.

Here's a photo of their swatches:
    Although Cinnamon Spice is my favorite among the three, I do love them all. I'm very satisfied with my purchase and I would like to create and experiment more makeup looks using each of them.

PRICE
Just like any other beauty products, the price of the lipsticks may vary depending on where you purchased them. I got the lipsticks for 200php each (that's roughly 5USD) from an online shop. 


WHERE TO PURCHASE
I got mine from an online shop but I think the lipsticks are very much available in malls. You just have to check because sometimes, some of the shades aren't available, which is the reason why I bought my lippies in an online shop instead of buying them in malls or any beauty outlet.

PROS
- long lasting
- very pigmented
- affordable
- available in many shades 
- doesn't feel dry even though it's matte

CONS
- has a subtle peculiar smell
- some of the shades are difficult to find
- may be hard to apply and to store


     For the price of 200php each (5USD), I have to say that the lipstick is a really great score. Wet n Wild Mega Last Lip Cover are all in matte but they aren't drying on the lips. It doesn't crack my lips or make it feel dry at all. Without any retouch, the color could lasts for up to four to five hours, also depending on the color you are wearing. 

     If you have tried the product, you'd agree with me about its smell. Nothing's really bad though, it's just that it's a bit peculiar. I don't know, I just wish it smells buttery like MAC or NYX but it doesn't. I don't think the creators thought about the smell but it's fine. Another main concern about the product is that it's quite difficult to store. The lipstick doesn't go all the way down on its tube making its cap messy (as you might notice on the first photo). For shades that are bolder just like the Vamp It Up shade, you really have to use a lip liner in applying it. Or if you are really good in applying lipsticks, then you just have to be careful. From my own experience, it's difficult to find some of its shades that's why if you want to purchase them, you have to really further your search.

     In totality, Wet n Wild Mega Last Lip Cover lipsticks are great if you are looking for an affordable but high quality matte lipstick. It also comes in so many beautiful shades in beautiful names so you can always find the best shade for you.

Share with me your thoughts about the lippies if you have tried using them in the comment section below. Thank you for reading! :)


love lots,
Tin

Saturday, January 2, 2016

Freebies: Blog Post Planner

     If you are someone like me who is still getting by the art of organizing, well I guess a blog post planner would be great for you too. Although I adore neatness and organization, there will always be times where procrastinating beats me to do nothing. In terms of blogging, I find it very important to think of creative ways to share my ideas and of course in laying them here as a blog post.

    I keep track of my blogging ideas in my personal journal but I find it more inspiring if I jot them down into something quirky and chic. In that case, I design my own blog post planners using free photo editing websites. What better way to start the year by sharing right? So for my first post in this year, I will share to your some downloadable blog post planners as freebies! yayy!!!
    
      Well they are not something over the top, however, I spent so much time on what to include in these planners. These planners are something fun, quirky and colorful, just as how I'd like my 2016 to be. If you wish to have a page of these blog post planners, then feel very free to download them by clicking the links below. You may directly print them in a computer or downloaded the jpg file then paste in a document before printing. The choice is yours' darling. And by the way, the ideal size of each planner is half of a short bond paper so if you wanna print it in a document type, you'll get to print two planners in one bond paper, talking about economics! hehee


Download Here

       Too much quirkiness and pink? well here's a neutral one that I recently designed. Perfect for coffee lovers just like me! :D


Download here
   
What do you think about the designs above? Do you want me to design some more? I would love to see your print outs if you love them. Thank you very much and have a wonderful week!

love lots,
Tin

Credits:
creativemarket.com
www.dreamstime.com
www.floatinglemons.com
www.designlovefest.com
San Jones Digital Co.
pinterest.com
www.colourbox.com
Scrapstorybook on Etsy.com

Note:
I'm not making any money out of the planners :) they are all made for fun and for personal use only!